v8.8
Summary
VM Client is a companion software of a larger suite of application known as VillageMaster (VM). It is a light-weight version of VillageMaster that runs on mobile devices such as iPhone, iPad, Android phones and tablets, as well as Windows 10 phones, tablets and desktops. Please check restrictions below if your device meets a specific requirement by way of device operating system (OS) and version number.

As with any mobile app, you will need to download the app from its respective store. For example, on iPads and iPhones, you tap the App Store icon and search for “VM Client” – please note that there is a space between the two words. Often, you will need to scroll down to find it as each store lists app in different order and preferences, especially the Google Play store. Once you find it, tap to download and install on your device. In certain circumstances, you may be required to download the app over a Wi-Fi connection due to the larger-than-normal size of the app to download over a subscriber (3G/4G) network.
This article describes installations and operations of VM Client app. Since it operates on multiple devices, operating systems and OS versions, examples and screenshots are shown in monochromatic sketches to illustrate the point so that the original device is not highlighted due to the identical look and feel on all devices.
Devices and Operating Systems
iOS
Pro Wi-Fi + Cellular, 9.7-inch iPad Pro, 9.7-inch iPad Pro Wi-Fi + Cellular, iPad (5th generation), iPad Wi-Fi + Cellular (5th generation), 12.9-inch iPad Pro (2nd generation), 12.9-inch iPad Pro Wi‑Fi + Cellular (2nd generation), 10.5-inch iPad Pro, 10.5-inch iPad Pro Wi‑Fi + Cellular, and iPod touch (6th generation).
Size: 118.6 Mb
Android
Compatibility: Requires Android 4.0 or later
Size: 45 Mb
Windows 10
Compatibility: Requires Windows 10 version 1607 or later. Compatible with Desktop, Mobile, Team, Holographic. Size: 45.7Mb
Launching VM Client

Tap app icon from installation folder to launch the application. If this is your first launch, the app will prompt you for a Site Code. You will find this Site Code at the top of VillageMaster server program which usually begins with a prefix “VM”. If you are not sure about this code, please email to sales@villagemaster.com.au to request one.
Site Screen
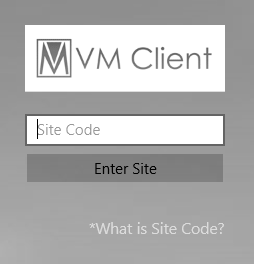
Type your Site Code in the input text as marked and then hit the return key or tap the Enter Site to proceed to login screen. Please note that the Site screen (shown on left) is only shown once unless you remove the app and re-install again. If you are managing multiple sites, you may need to change the Site Code to the new location. You can do this by performing a special double-tap operation in the login screen discussed below.
Login Screen
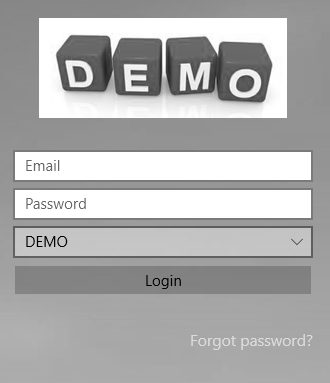
Your company logo is typically displayed at the top of the login screen. In this example, it is showing the “Demo” fictitious company logo.
Enter the username or email address and password then hit the enter key from the keyboard or tap the Login button.
The login process takes can take up to 10 seconds due to the initial download of critical data from the server. You don’t need to login again to use the app unless critical data have been modified in the server or a new VM Client upgrade requires that you need to re-login again. If you are managing multiple sites as discussed earlier, you may need to quit the login screen and go back to the Site screen. To do this, you need to double-tap an “invisible” link below the words “Forgot password?”. This unusual operation is intended to avoid users from accidentally returning to the Site screen and cause unnecessary confusion.
Navigation
Navigation screen differs slightly when operating devices with small screen such as phones then that of a tablet or desktop. VM Client makes use of available screen real-estate to display as much information as possible including display of navigation screen and information screen in such a way that reduces the need to transfer from one screen to another. Here is an example of how navigation screen is presented in a phone and in a tablet.
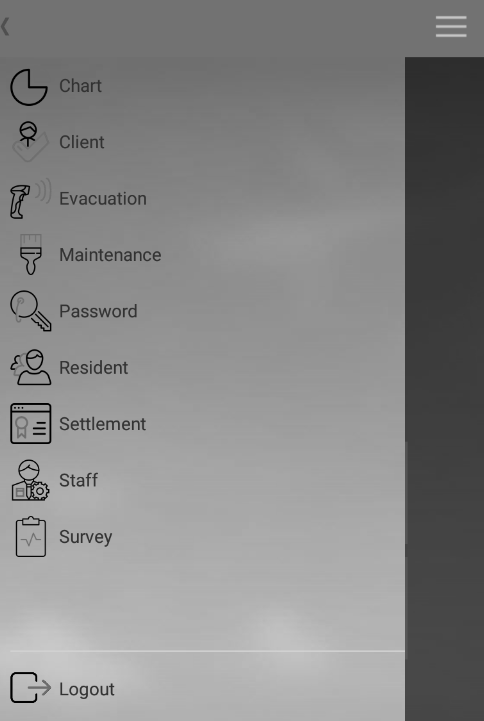
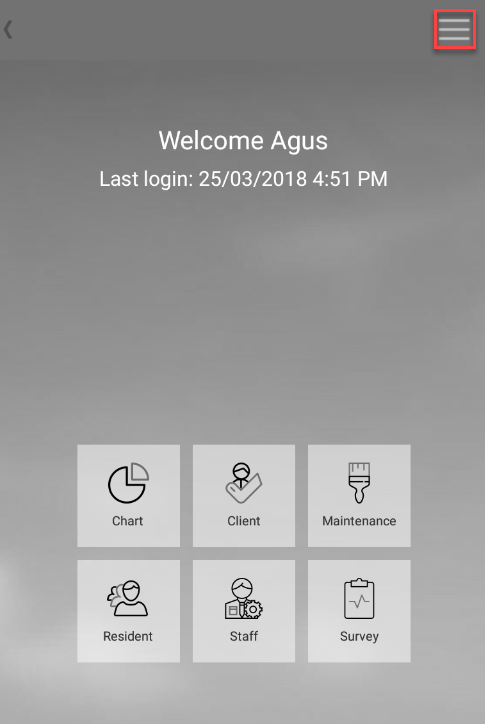
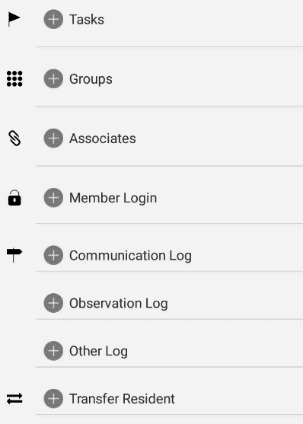
The navigation button is marked in red square above. Tapping the navigation button exposes the navigation menu containing a list of options to choose. Small devices such as phones can display up to six choices on the home screen, while tablet and desktop shows up to eight (see below).
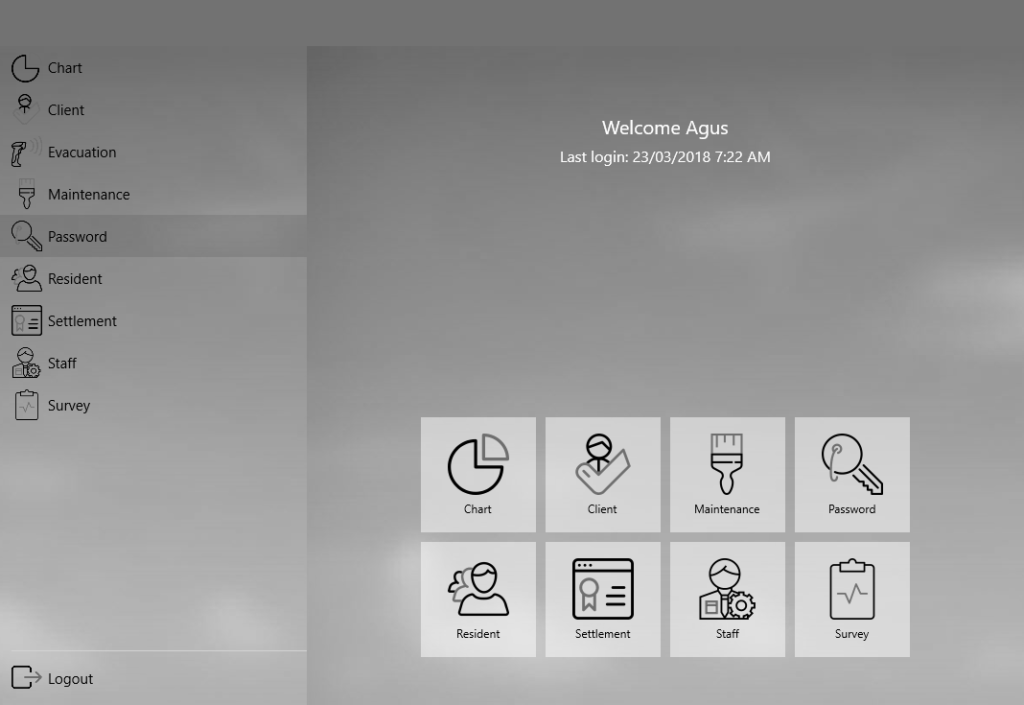
The navigation menu is displayed permanently on tablet or desktop. On smaller iPad and Android screen, the navigation menu is also hidden until required. This behavior is also identical when the device is in portrait mode.
The Back Button
Whenever visible, the back button returns you to previous screen. Unless there are changes on current data entry screen, you are not required to confirm whether you wish to abandon any changes.
The Hamburger Button
This button is indicated by a three-horizontal bar at top right corner of the screen. It is also known as the navigation button. If the navigation menu is already visible, this button is ignored.
Data Entry
There are two ways to get an entry form in VM Client.

For example, in a client screen below the insert and update button are located appropriately at the top and at the side respectively.
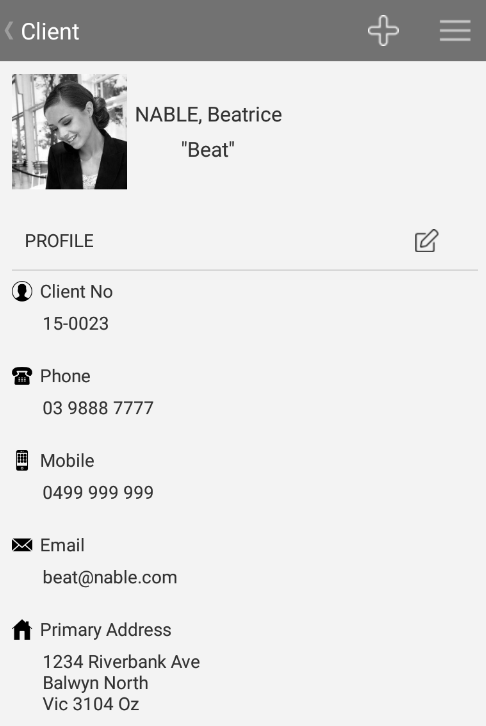
The Insert button creates a new client record by displaying an empty form.
The Update button can appear in many sections within a single screen. In this instance, the update button is in the client profile section.
Tapping the update profile button takes you to a profile editor screen.
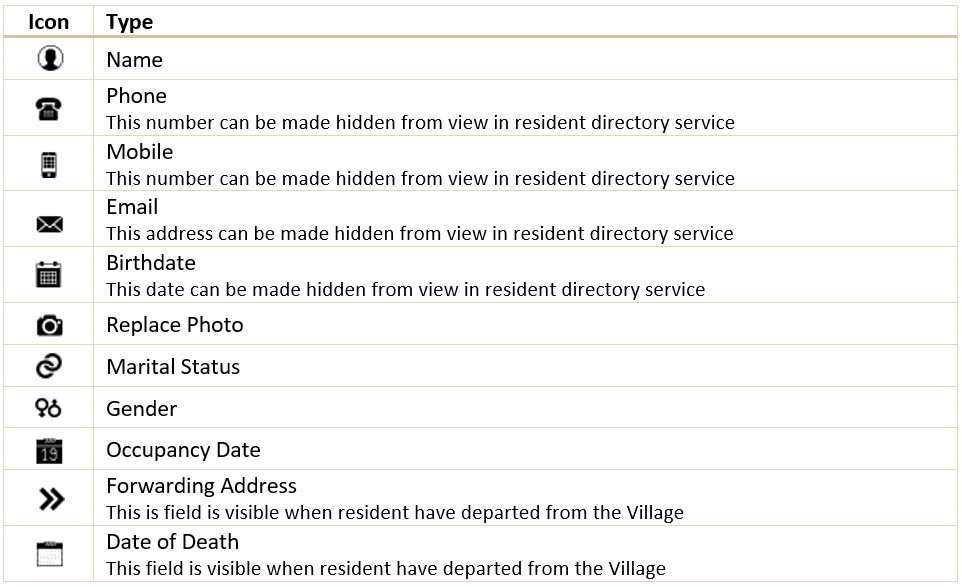
Special Fields
Phone, Mobile and Email fields are special fields that launch a dialer window when tap. This is especially useful when calling the client by tapping either the phone number or mobile number. The email field takes you to email compose screen on your default program.
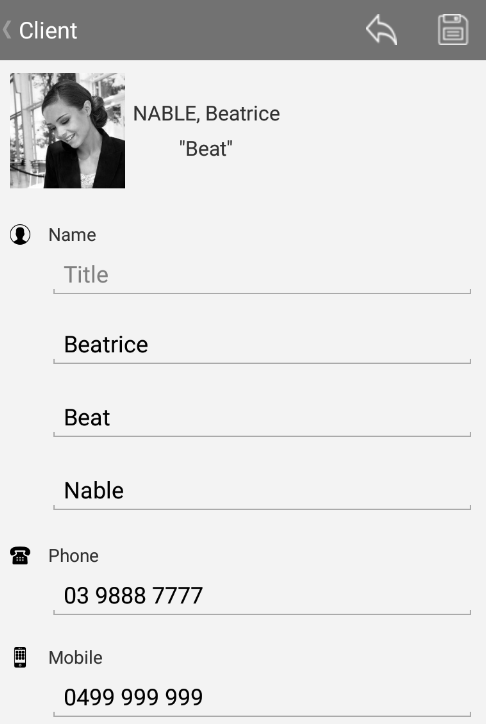
Data entry form contains a pair of button known as Discard and Save buttons. If you use a hardware button (Android and Windows) to return to previous screen without saving, the app will save all changes automatically. Otherwise, on soft back button like iPhone, you will be asked to confirm that your action will discard all changes.
Basic Fields
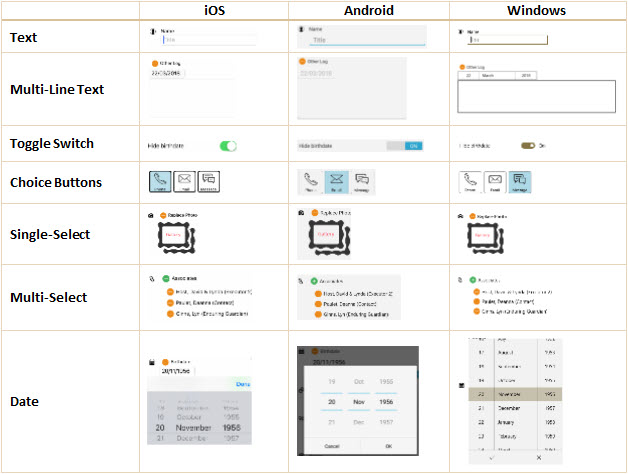
Inline Fields


Inline fields are a combination of two or more basic fields that expands and collapses in response to the plus (+) and minus (-) button. You will find that several forms are built with a mixture of Basic and Inline fields.
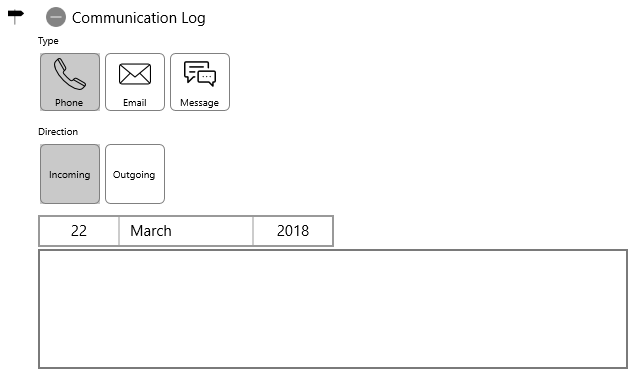
This communication log entry is made up of choice buttons, dates and multi-line text. It is only displayed in full form like this when you tap the plus button to expand the form and select the appropriate choices.
Savings & Discarding
A form often contains multiple entry fields. The following example shows a form that is made up of single and multi-select fields. Each field expands to into an inline field:
You can enter data into a selected field by first tapping the plus sign. In the inline field you may be presented with further inline fields depending on choice selected.
Data entered an inline field are saved when you tap the Save button. They are also saved when tap the hardware back button or navigate away from the page.
The Discard button is provided so that you can abort all changes made to the page. You will be asked to confirm that you want to leave without saving any changes.
Screen Anatomy
Devices are divided into two major categories that affects VM Client app behavior, especially placements of navigation controls and general look and feel. On small screen such as phone and mini tablets, the app splits menu and presentation screens into two sections. One section overlay onto the other while on larger screen both sections are displayed together side by side.
The navigation pane is shown permanently on the left side of the screen whenever it is on landscape mode. The presentation pane contains detail of the selected item, this usually contains one or more columns depending on available screen space.
You scroll upward to see further information beyond visible area.
On a phone or portrait mode, the navigation pane is displayed only when you tap the hamburger button shown.
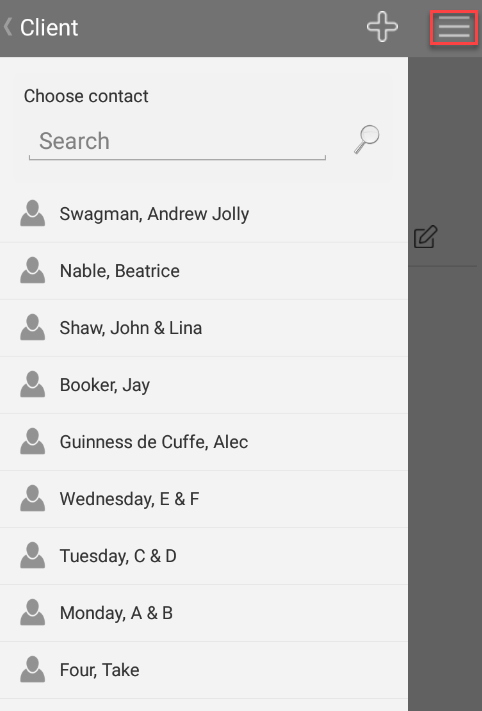
You can select an item from the list or search for an item using the search text provided. Once selected, the navigation pane moves away from the main screen to expose the presentation pane below it.
This type of navigation pane overlay on presentation pane is also known as Master-Detail. Most of VM Client screens are shown this way.
On iPhone, you also swipe to right to expose the navigation pane. But this is not quite so obvious.
Available Functions
| Symbol | Description |
|---|---|
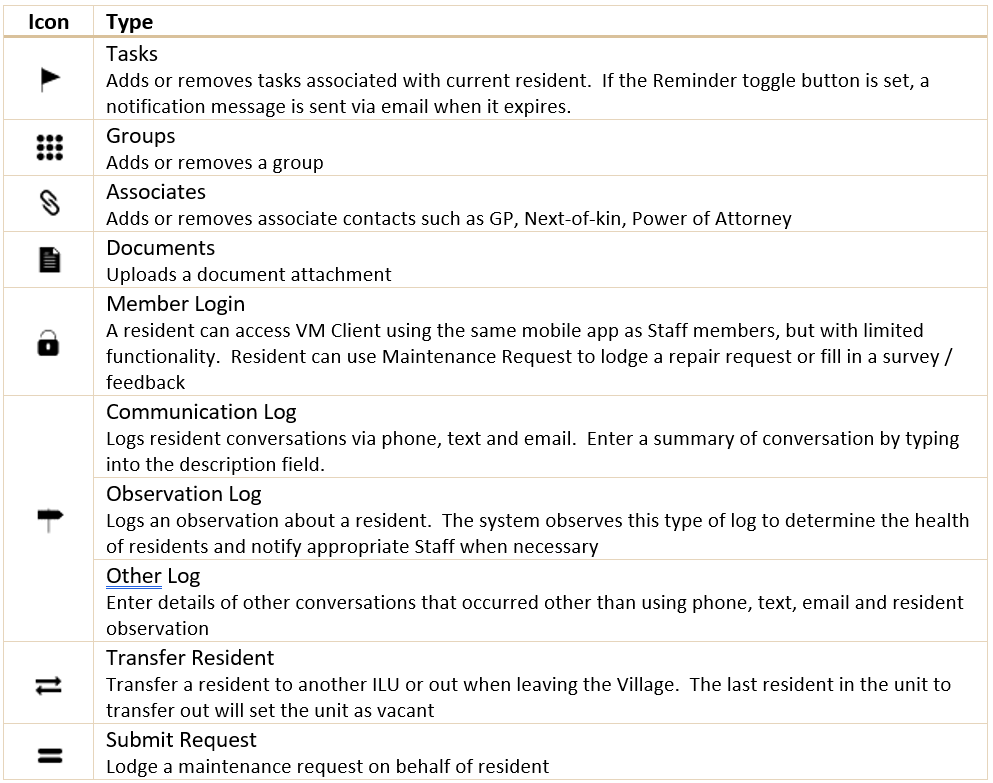
 | Manages client profile & activity including name & addresses, contact details, inquiry detail, tasks, groups and conversations |
 | Manages resident profile & activity including health, pension, insurance, associates & next-of-kin detail. Resident also manage all tasks, member login, maintenance requests and conversations. |
 | Records and processes client contract detail for subsequent settlement. This includes registering property ownership and resident detail. |
 | Manages staff profile and login access. Staff access determines what modules are accessible to staff members. |
 | Manages survey and extended entity profile attributes. |
 | Manages repairs and maintenance including request lodgments, order submissions, search filter and incorporating photographic items |
 | Customizable chart to display statistical summary like client distributions (with maps), resident ages, new clients monthly and other custom charts as required. |
 | Operates wireless scanning facility for village evacuation |
Client
Use this function to create client details such as contact address, phone numbers, to do tasks, conversation logs, property reservation and more. Tap the plus button to start a new entry form to begin creating a profile. This profile record contains basic information about the client such as first and last name, home phone number, mobile and email as well as home address. You can also add an accompanying photo should you have one handy. You can source this photo either through the device camera or photo gallery.
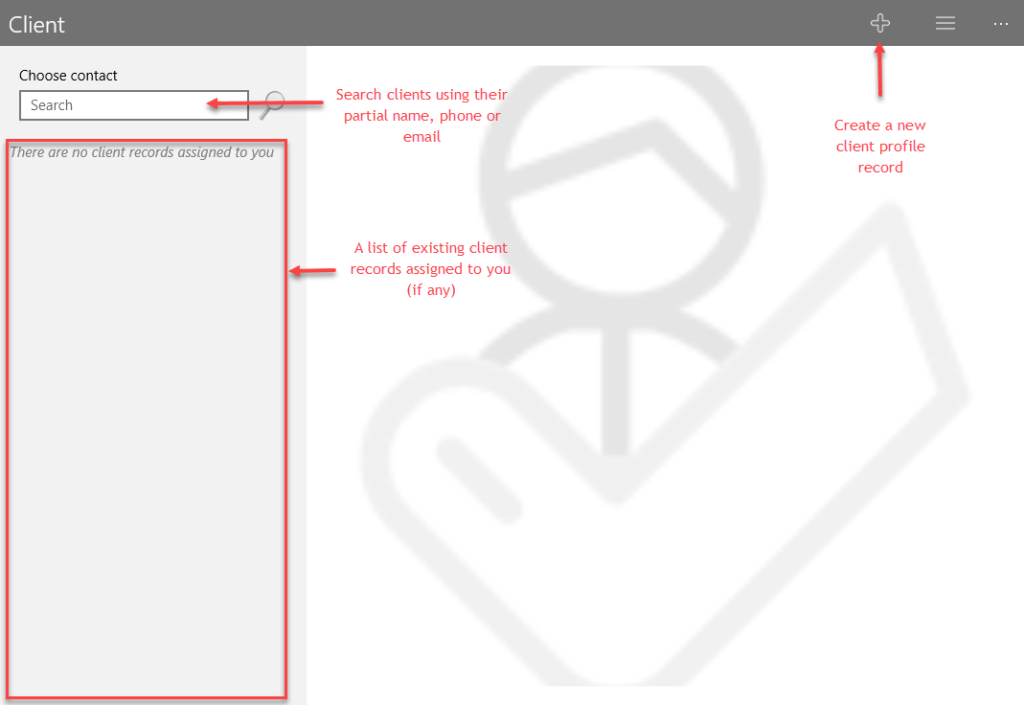
Contact Search
Use this field to search for clients by name, suburb, phone or mobile attributes. Each character entered narrows down the choice list which drops down for you to choose from. You can use multiple words separated by space to find attributes that matches all words.
Current and former residents are not listed unless proceeded by * character. For example, typing *john will search all records containing john regardless whether clients have become residents or have left the village.
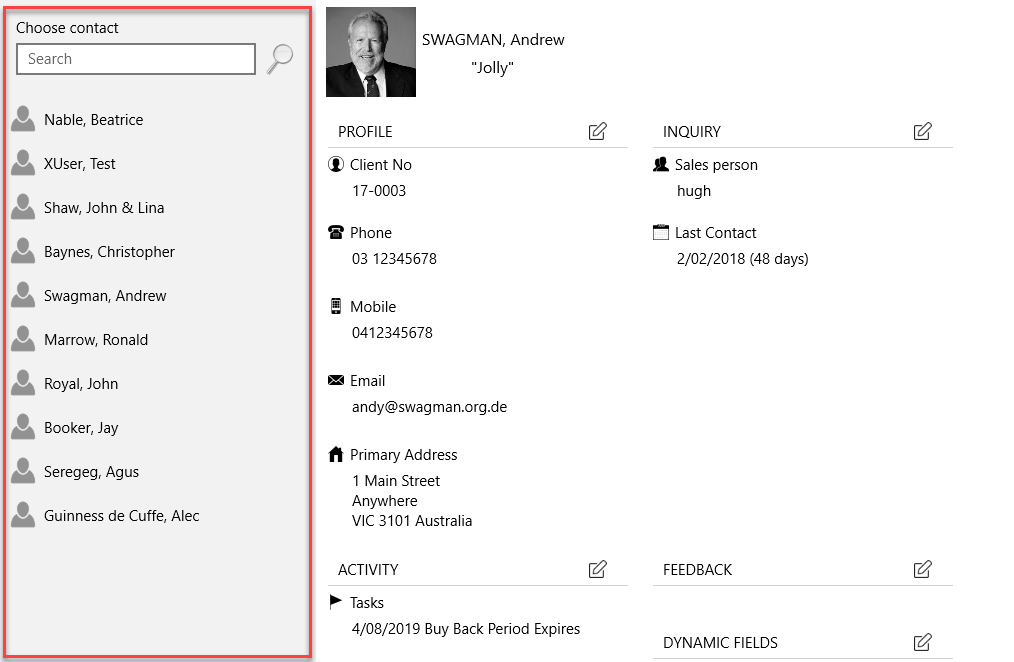
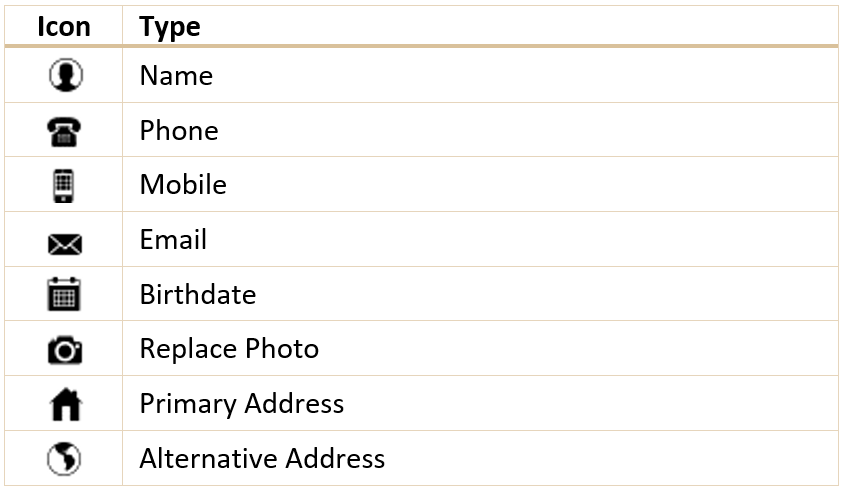
Profile Section
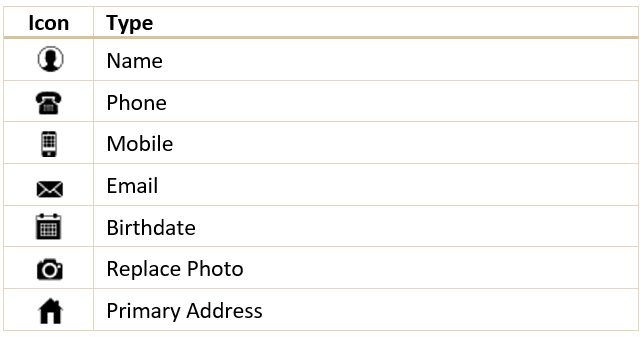
Essential information about client identification and contact numbers
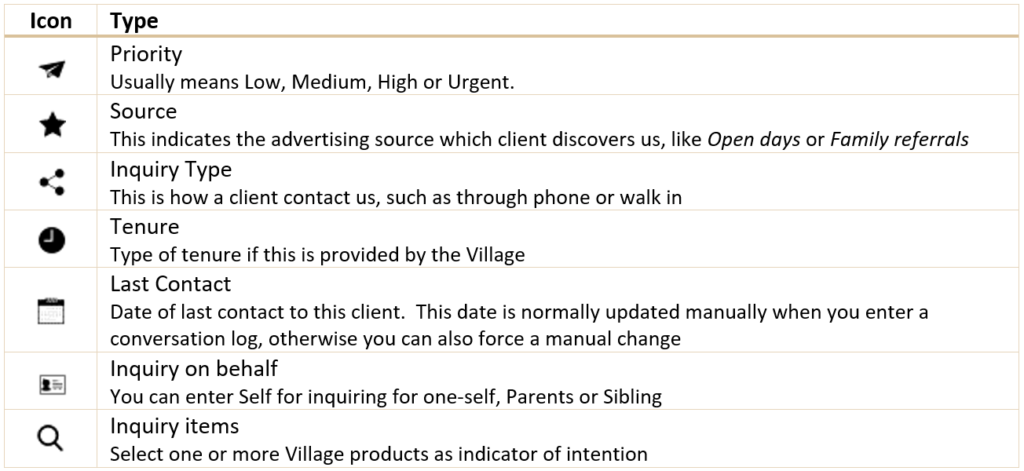
Inquiry Section
Inquiry Section
Containing information about client current inquiry
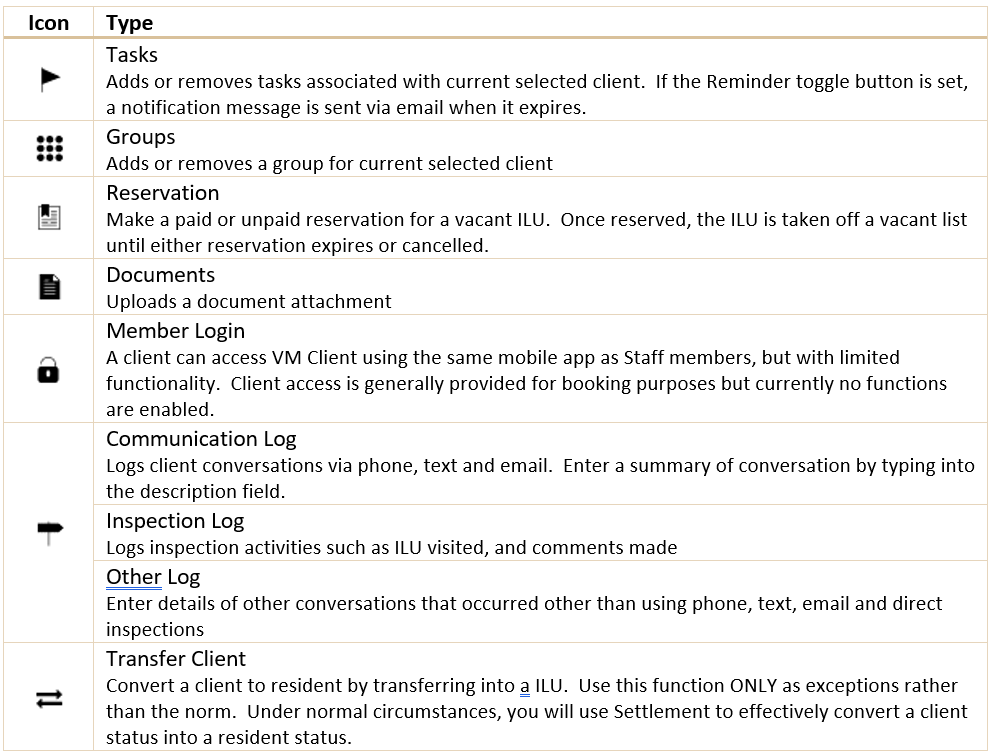
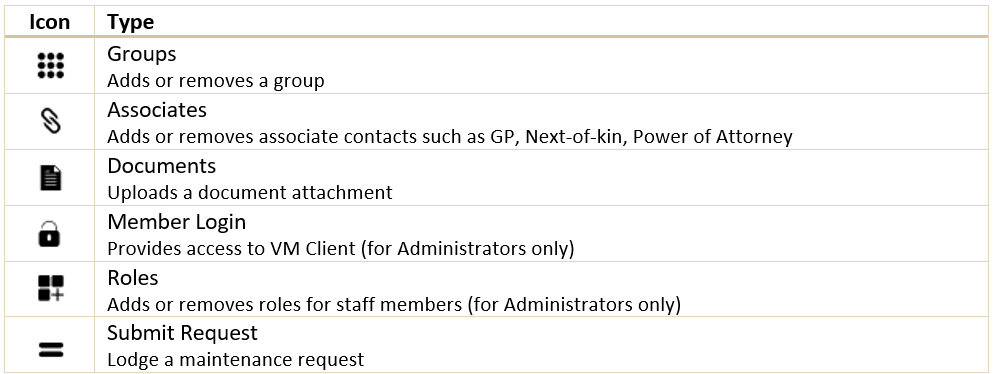
Activity Section
Contains actions by staff members
Feedback Section
This section is only available on mobile version. On desktop, this will appear as external Survey under the name “Additional Info”.
Dynamic Fields
A list of extended attributes with strong types such dates, text, integer, boolean and currencies. Use dynamic fields to capture custom attributes not already provided by VM Client.
Deleting A Client
You can delete a client by following these steps.
- Type the name in the search text box
- Select the client from drop down box
- Swipe left (iOS) or tap-and-hold (Android) or right click (UWP) the client from the list, then tap Delete. You must be an administrator to perform this operation
Generally, you can delete a client immediately after discovering a mistake. For example, entering another entry of the same name. You cannot delete a client once activities are entered against that client. For example, there is a deposit payment or scheduled to become a resident.
Making a Call
You can make a call by tapping the phone number or mobile number from the Profile section.
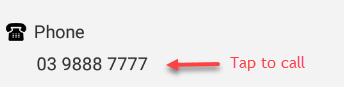
This is ignored if your device cannot make a phone call, for example, you are using a tablet or desktop.
Compose Email
You can begin composing email by tapping the email address in the Profile section.

Please note that VM Client does not log this conversation as you are using external email provider to send this email.
Resident
Use this function to manage your resident’s profiles and activities.
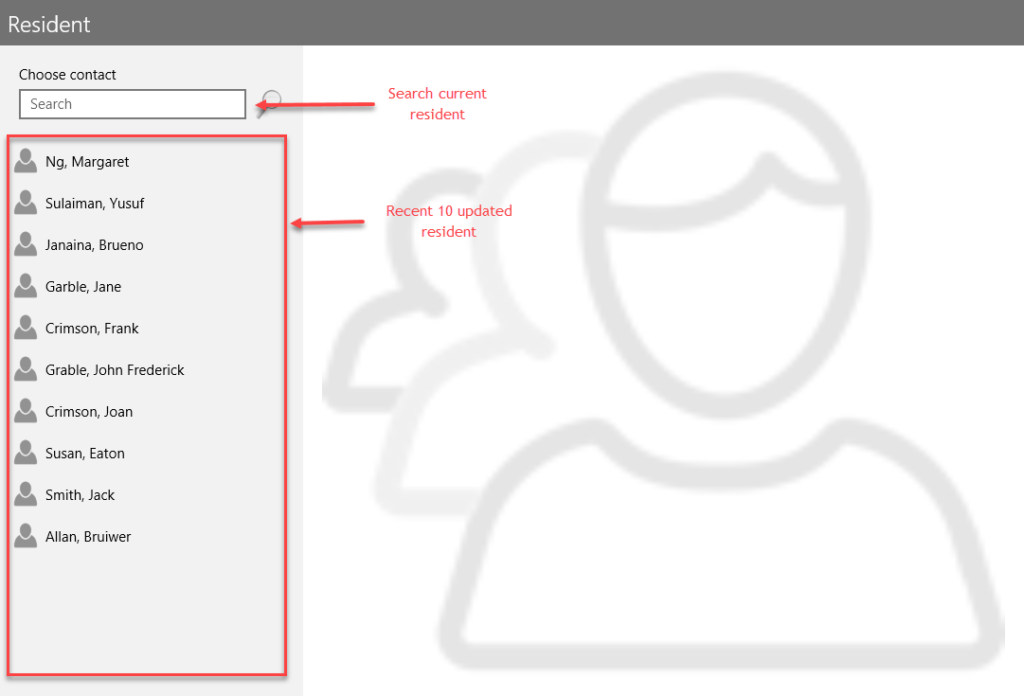
Search Resident
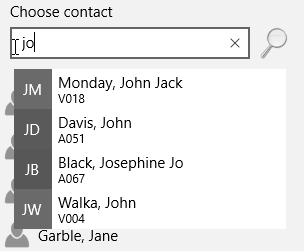
You can search for a resident by typing the name, phone, email or ILU number into the text box.
A matching list of records are displayed for you to choose from. Enter more words separated by spaces to narrow down search and then tap one of the list to confirm selection. The list shows current active resident but if you intend to select a former/departed resident, then you need to prepend a * character, such as *john
Profile Section
Essential information about client identification and contact numbers
Essential Section
Important information to remember
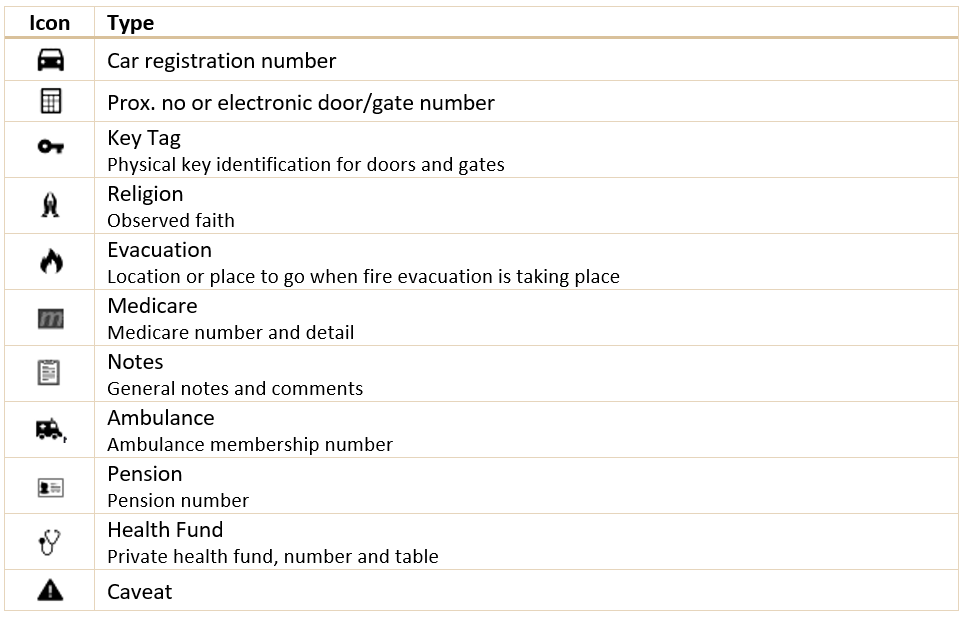
Activity Section
Contains actions by staff members
Feedback Section
This section is only available on mobile version. On desktop, this will appear as external Survey under the name “Additional Info”.
Dynamic Fields
A list of extended attributes with strong types such dates, text, integer, boolean and currencies. Use dynamic fields to capture custom attributes not already provided by VM Client.
Making a Call
You can make a call by tapping the phone number or mobile number from the Profile section.
This is ignored if your device cannot make a phone call, for example, you are using a tablet or desktop.
Compose Email
You can begin composing email by tapping the email address in the Profile section.
Please note that VM Client does not log this conversation as you are using external email provider to send this email.
Settlement
Use settlement function to process a client into resident. When a client pays a deposit to indicate an expression of interest, his/her detail is shown in a reservation list (below).
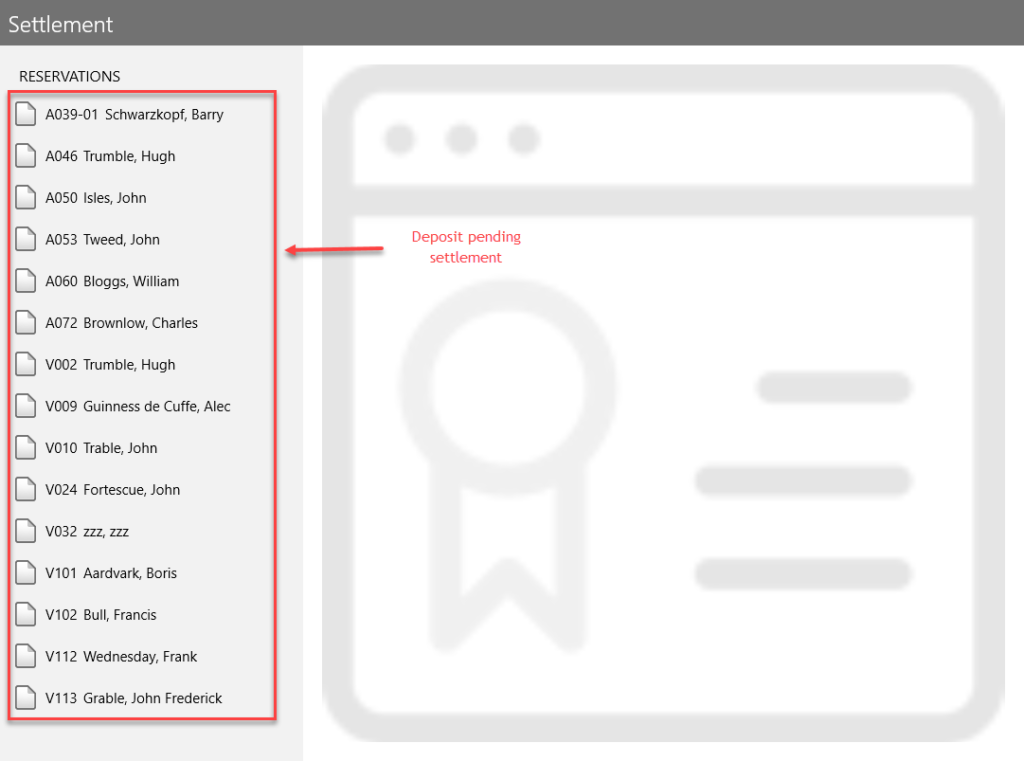
Contract Detail Section
Primary contract information
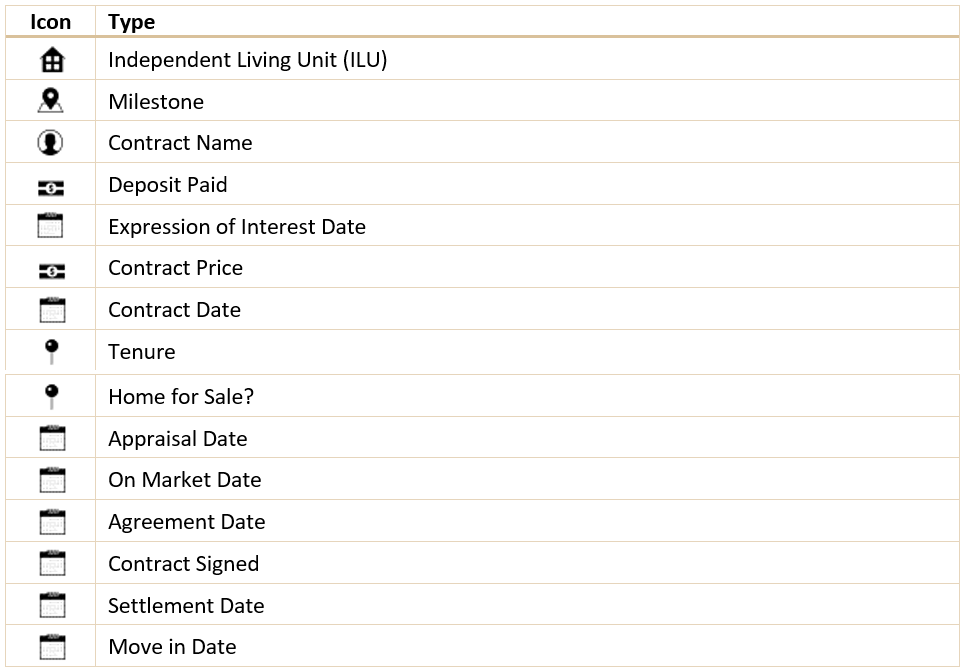
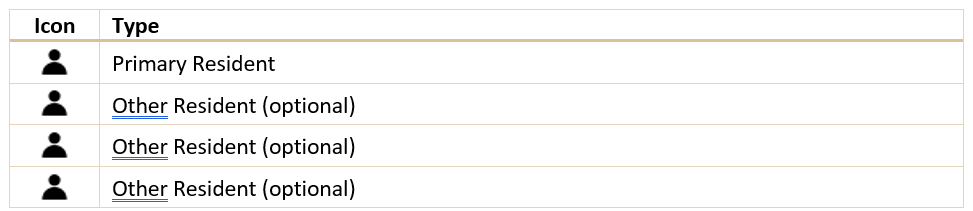
Resident Detail Section
List of residents
Finalize Settlement
This function is available when the Contract Price and Settlement Date fields are populated with appropriate values.
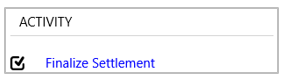
Please note that the resident contract information will not longer visible in the Reservations List (above) upon completion of this Finalize Settlement function.
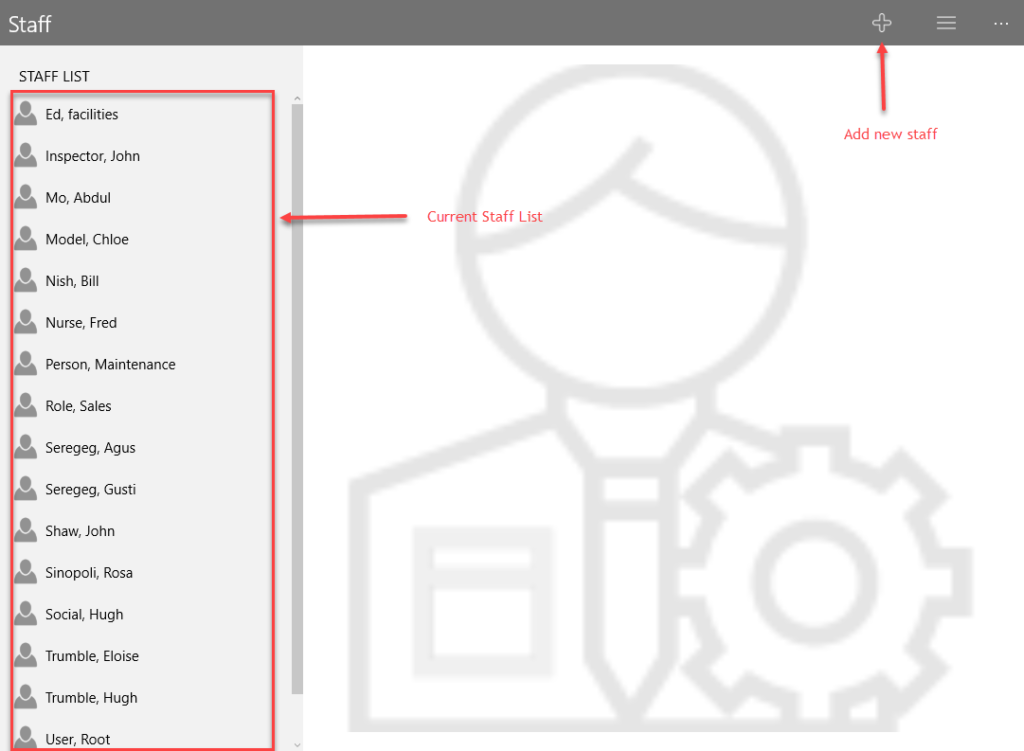
Staff
You can maintain staff profile and access to VM Client through this function. It is primarily used by administrators to create or remove staff login access, roles, associates and maintenance request submissions.
Profile Section
Essential information about staff identification and contact numbers
Activity Section
Contains actions by staff members
Deleting A Staff
You can delete a staff by following these steps
- Select the staff you wish to delete
- Swipe left (iOS) or tap-and-hold (Android) or right click (UWP) the staff from the list, then tap Delete. You must be an administrator to perform this operation
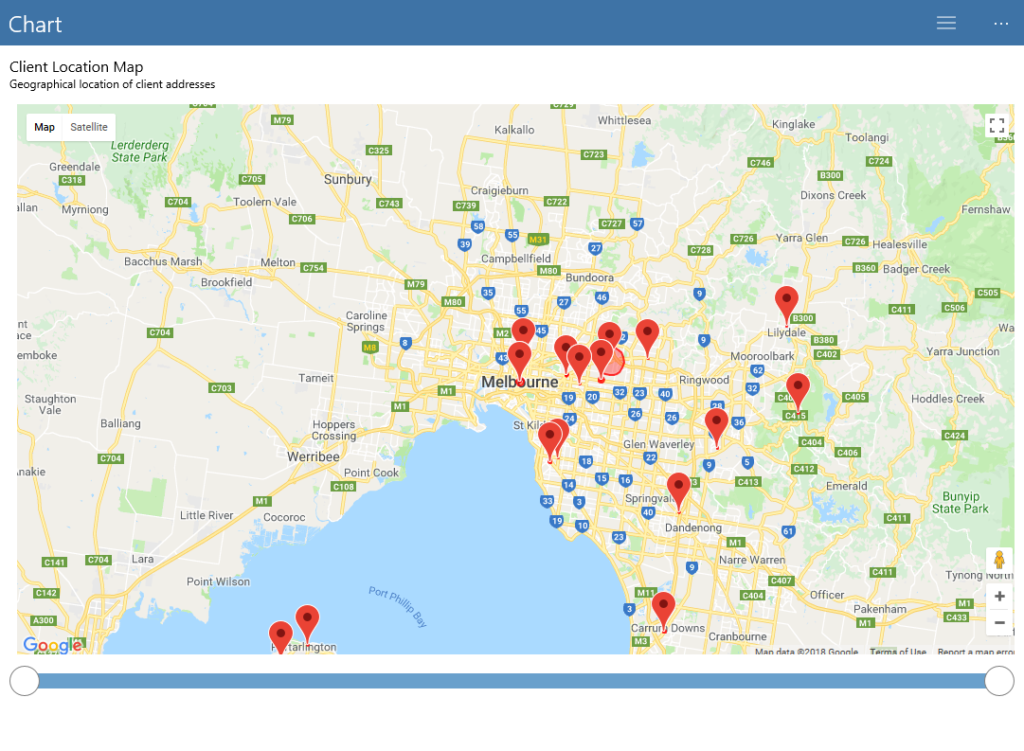
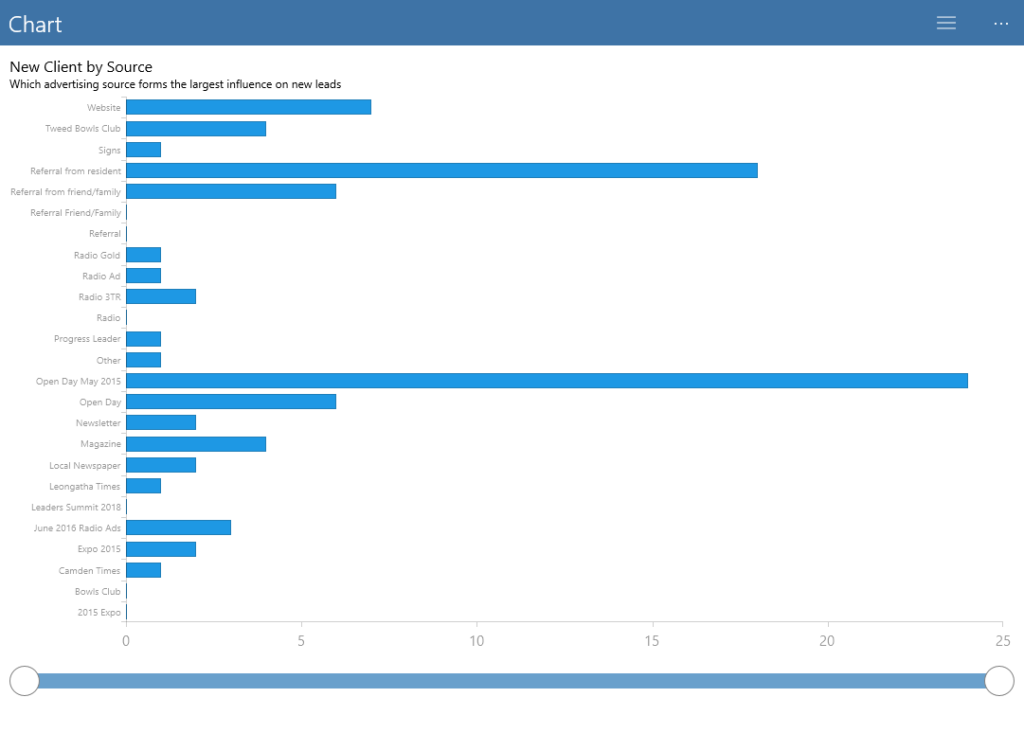
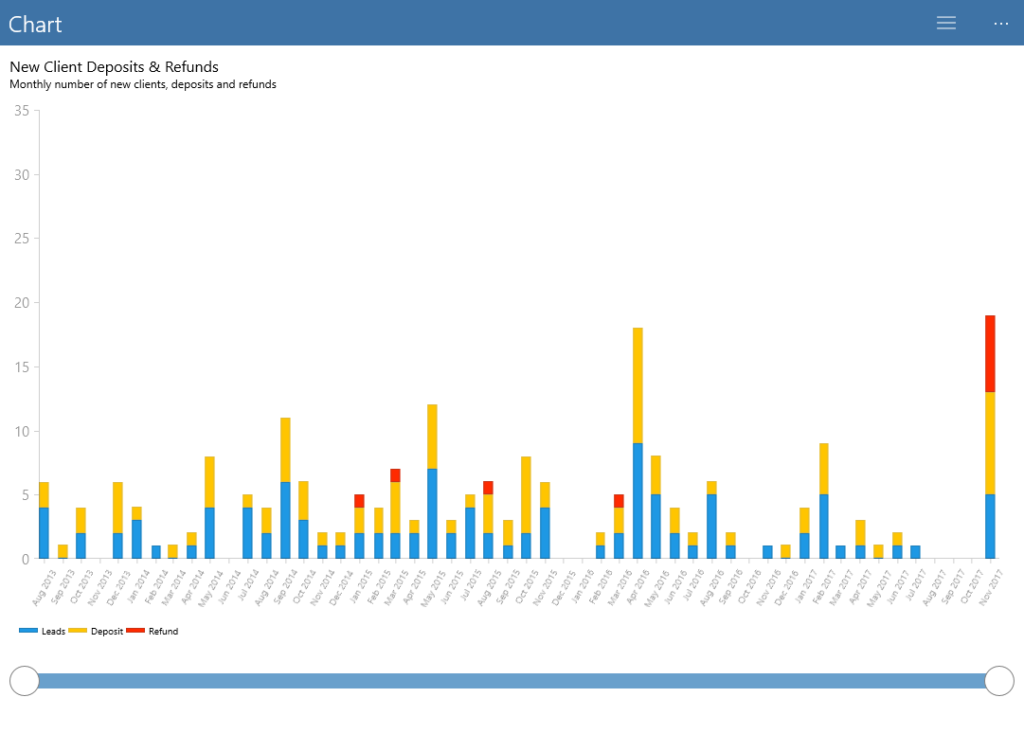
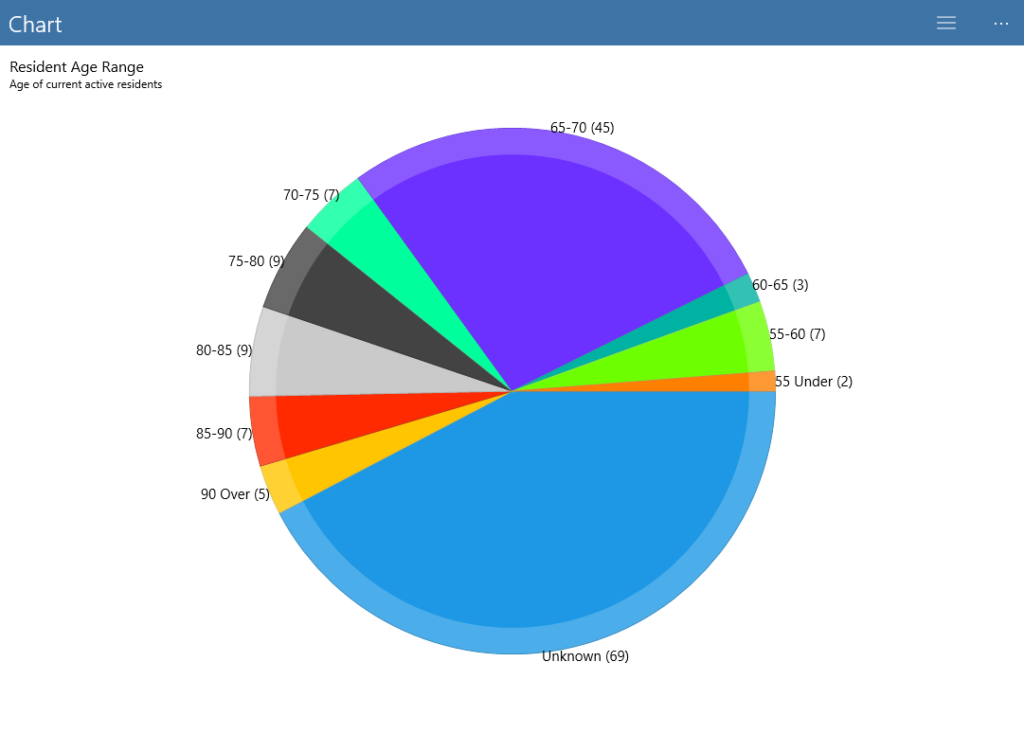
Chart
Use this function to display statistical summary of clients or residents such as new clients, average age of residents, client home map location and more. Charts are customizable to each Village. Here are a few examples of standard charts that you can use out-of-the box.